
PLUG IT IN
So you have arrived home with your plant - now what?
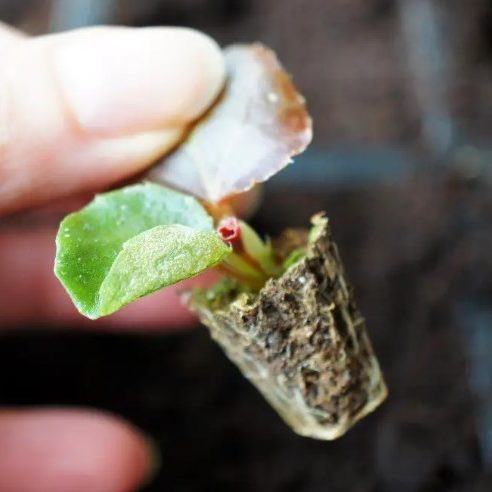
Herbs
When you arrive home with your herb plug plants, you have two choices - grow them in a pot / container or grow in the soil.
If using a pot / container, we would reccomend using a peat-free compost with added grit / sand.
To free your plug plant, gently massage the plug tray to loosen the root ball. Holding each plug by its leaves or the rootball, carefully place it in the hole you have made in your compost / garden.
The hole should match the size of the rootball (usually this can be done with your finger).
Tap around the plant with your finger tips to firm the compost gently around the plug and ensure the roots spread as the young plant grows.
Water regularly to keep the soil moist.
Vegetables
Your vegetable plug-plants need to be treated in much the same way as herb plug plants.
You have two choices - plant them straight out into the garden after the frosts have finished or grow them in a pot or container while waiting for the weather to warm up.
If using a pot / container, we would reccomend using a peat-free compost (no need for grit / sand). Water regularly to keep the soil moist.
Vegetables love a liquid feed made with comfrey / nettle leaves which relase potassium / nitrogen / phosphorus to aid growth. We sell comfrey so why not buy some and grow your own organic fertiliser!
Fruit bushes
These can be planted immediately into the soil. Currants and gooseberries are the decendents of native woodland plants and are tough.
They can survive in relatively poor and shady conditions but, if you want to maximise the fruit you get, add peat-free compost and pick somewhere sunny.
Trees
Trees arrive in pots. Treat them like fruit bushes but allow room for them to spread as they are trees not bushes!
Make sure they are not close to buildings because of the potenial of root spread which can be up to 10m. To keep them small you wiil need to pollard them every 5 to 10 years.
Willow cuttings
Phew - no hole digging required! First you need to find the pointed end with the slanted cut - this is NOT the end that goes in the ground!
It's the square end that gets pushed into the ground. Keep pushing until two thirds of the cutting is underground.

We need your consent to load the translations
We use a third-party service to translate the website content that may collect data about your activity. Please review the details in the privacy policy and accept the service to view the translations.